Are you planning to hire a professional junk removal service but unsure how to get started? The U.S. residential junk removal segment is projected to reach $6.1 billion in 2024, reflecting the growing demand for professional decluttering services. Proper preparation can make the difference between a smooth, efficient experience and a frustrating, time-consuming ordeal.
Whether you’re clearing out your garage, downsizing your home, or tackling a renovation project, this comprehensive guide will walk you through everything you need to know to prepare your home for professional junk removal services.
Why Proper Preparation Matters
A bit of preparation helps things run more smoothly by grouping items, checking for special disposal needs, and clearing access routes to ensure a faster, safer, and more cost-efficient experience. Taking time to prepare before the crew arrives can save you both time and money while ensuring nothing important gets accidentally removed.
Step 1: Assess and Categorize Your Items
Create a Comprehensive Inventory
The first step is to assess what you need to get rid of by walking through your space and identifying items that are broken, unused, or no longer needed, then making a comprehensive list that helps in understanding the scope of the work and communicating your needs to the junk removal service.
What to include in your inventory:
- Old furniture and appliances
- Electronics and e-waste
- Construction debris
- Yard waste and outdoor items
- Household goods and miscellaneous items
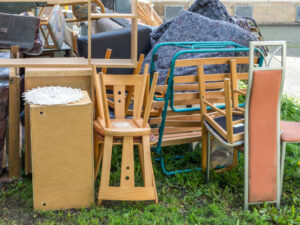
Sort Into Categories
Start by organizing your items into three categories: keep, donate, or remove. This sorting process helps you:
- Identify items that can be donated to charity
- Recognize recyclable materials
- Determine what truly needs to be disposed of
- Potentially reduce your overall junk removal costs
According to the EPA, around 20% of items removed by junk removal services are donated or recycled, making it beneficial to separate reusable items beforehand.
Step 2: Understand What Can and Cannot Be Removed
Know the Restrictions
Not all junk removal companies accept the same items. Junk removal companies accept a wide variety of items, but they don’t pick up certain items like batteries, tires, paint, and thermometers because of state waste disposal laws.
Commonly restricted items include:
- Hazardous materials (chemicals, asbestos, paint)
- Propane tanks and flammable materials
- Medical or biological waste
- Certain batteries and electronics
Hazardous materials such as chemicals, asbestos, and certain electronics may require special disposal methods, so confirm with the junk removal service about what can and cannot be taken to avoid surprises on removal day.
For information on proper hazardous waste disposal, consult the EPA’s guidelines at their official website: https://www.epa.gov/regulatory-information-topic/regulatory-and-guidance-information-topic-waste
Separate Special Items
If you have items requiring special handling, set them aside and make arrangements for proper disposal through appropriate channels.
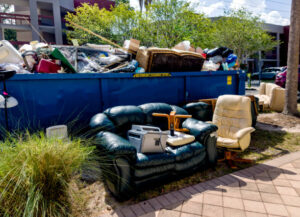
Step 3: Designate a Staging Area
If possible, designate an area where you can temporarily store items that need to be removed, as this makes it easier for the junk removal team to access and haul away your items quickly, with a garage, driveway, or a cleared room serving as a good staging area.
Benefits of a staging area:
- Speeds up the removal process
- Reduces confusion about what should be removed
- Minimizes the risk of removing wrong items
- Can potentially lower your costs
Step 4: Clear Pathways and Ensure Safe Access
Remove Obstacles
Make sure there is a clear path from the junk location to the exit and remove any obstacles or tripping hazards. This is crucial for both safety and efficiency.
Preparation checklist:
- Clear hallways and doorways
- Move rugs, cords, and small furniture
- Ensure stairways are accessible
- If your building has an elevator, reserve it if possible, and for multi-floor homes, let the crew know in advance if large or heavy items are upstairs
Protect Your Property
Organizing items, scheduling appointments, and taking safety precautions are key steps to ensure a smooth junk removal experience, as safety is especially important—ensuring the removal area is clear and accessible helps facilitate efficient service and reduces the risk of accidents.
Step 5: Label Items Clearly
For large or bulky items, consider labeling them with tape or stickers to indicate which items are to be removed, as this can help avoid confusion and ensure that only the intended items are taken.
Labeling tips:
- Use bright colored tape or stickers
- Mark items clearly as “REMOVE” or “KEEP”
- Group similar items together
- Take photos for your records
For detailed preparation steps, you can reference this comprehensive guide: https://www.1800gotjunk.com/us_en/blog/decluttering/7-steps-to-take-before-junk-removal
Step 6: Schedule Your Service Strategically
Choose the Right Timing
Plan your junk removal service well in advance to ensure availability and adequate preparation time, as this is particularly important during peak seasons when services might be in high demand.
Peak demand periods:
- Junk removal businesses experience peak demand during spring cleaning season, with a 30% increase in bookings
- Post-holiday periods
- End of month (moving season)
- Weekends
Book Early for Better Rates
Consider scheduling during off-peak days like weekdays instead of weekends, as removal companies might offer better rates and more flexible time slots, giving you the benefit of a more personalized service.
Step 7: Communicate Special Requirements
Provide Detailed Information
Clear communication is essential to ensure they understand your needs and can provide the best possible service, so provide them with detailed information about the items you need removed and any special requirements you may have.
What to discuss with your junk removal company:
- Large or exceptionally heavy items
- Items requiring disassembly
- Special access challenges (narrow staircases, long driveways)
- Time constraints or scheduling preferences
Additional preparation guidance can be found here: https://www.novajunk.com/08/how-to-prepare-for-a-junk-removal-service-a-step-by-step-guide/
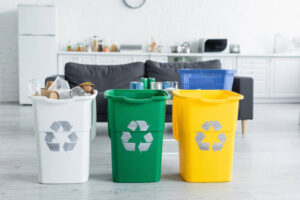
Step 8: Consider Donation and Recycling Options
Maximize Environmental Impact
Junk removal companies recycle approximately 60% of the waste they collect, but you can help maximize this by pre-sorting items.
Items commonly accepted for donation:
- Furniture in good condition
- Working appliances
- Clothing and textiles
- Electronics that still function
- Books and household goods
For information about recycling benefits and guidelines: https://www.epa.gov/recycle/recycling-basics-and-benefits
Items that are in good condition can be donated instead of discarded, and many junk removal services can help facilitate donations to local charities, making your decluttering process socially responsible and environmentally friendly.
Step 9: Double-Check for Personal Belongings
Prevent Accidental Removal
Before the junk removal team arrives, it’s essential to double-check for personal belongings to ensure nothing valuable is inadvertently included with the junk, as this step is crucial to avoid any regrets after the removal process.
Areas to check thoroughly:
- Drawers and cabinets
- Pockets of clothing or furniture
- Storage compartments
- Garage corners and attic spaces
Thoroughly inspect areas where items may be hidden, such as drawers, cabinets, and the garage, as hidden spaces can easily be forgotten, so take a moment to scan each area thoroughly.
Step 10: Prepare Payment and Paperwork
Financial Preparation
Preparing payment and paperwork in advance can save you from any last-minute hassles, as junk removal teams generally accept major credit cards, digital payments, and checks.
What to have ready:
- Preferred payment method
- Any coupons or discount codes
- Service agreement or contract
- ID if required by the company
Day-Of Tips for Success
When the junk removal team arrives:
- Do a final walkthrough – Point out any items requiring special care
- Stay available – Be present to answer questions
- Provide clear instructions – Provide clear instructions to the junk removal team by pointing out any specific items that require special handling or areas of the property that need extra care, as clear communication ensures that your expectations are met
- Document before and after – Take photos for your records
Understanding the Cost Factors
While prices vary by location and company, junk removal businesses typically charge between $125 to $400 per job. Proper preparation can help you get a more accurate estimate and potentially reduce costs.
Factors affecting pricing:
- Volume of junk (measured in truck space)
- Type of items being removed
- Accessibility and distance from truck to items
- Special disposal requirements
- Labor intensity
The Environmental Impact of Professional Junk Removal
Choosing a professional junk removal service isn’t just convenient—it’s environmentally responsible. The junk removal industry diverts approximately 74% of removed items from landfills through recycling and donation.
By properly preparing your items and working with eco-conscious removal services, you contribute to:
- Reduced landfill waste
- Increased recycling rates
- Support for local charities
- More sustainable waste management practices
Common Mistakes to Avoid
Don’t make these preparation errors:
- Waiting until the last minute – Schedule at least a week in advance
- Mixing restricted items with regular junk – This causes delays
- Failing to measure large items – Teams need to know what they’re handling
- Not communicating access issues – Surprise obstacles waste time
- Forgetting to check all spaces – Personal items can be accidentally removed
After the Junk Is Gone
After junk removal, professionals perform a basic sweep-up of the floors in any areas where they worked to ensure your space is clean and ready for its next use, though a quick sweep or wipe-down can help you transition smoothly to your next project.
Post-removal checklist:
- Inspect the area for any remaining items
- Check for any property damage (rare but good to verify)
- Request donation receipts if applicable
- Leave a review to help future customers
Conclusion
Preparing your home for a professional junk removal service doesn’t have to be overwhelming. By following these ten steps—from creating an inventory and clearing pathways to communicating special requirements and double-checking for personal items—you’ll ensure a smooth, efficient, and cost-effective junk removal experience.
Junk removal can transform your living or working space, creating a more organized and pleasant environment, however preparing for a junk removal service requires thoughtful planning to ensure a smooth and efficient process.
Remember, the key to success is planning ahead, clear communication, and choosing a reputable junk removal company that prioritizes recycling and responsible disposal. With proper preparation, you’ll reclaim your space quickly and sustainably while supporting environmental conservation efforts.
Start preparing today, and enjoy the peace of mind that comes with a clutter-free home!
References
- U.S. Environmental Protection Agency – Regulatory and Guidance Information by Topic: Waste: https://www.epa.gov/regulatory-information-topic/regulatory-and-guidance-information-topic-waste
- 1-800-GOT-JUNK? – 7 Steps To Take Before Junk Removal: https://www.1800gotjunk.com/us_en/blog/decluttering/7-steps-to-take-before-junk-removal
- Nova Junk Removal – How To Prepare For A Junk Removal Service: https://www.novajunk.com/08/how-to-prepare-for-a-junk-removal-service-a-step-by-step-guide/
- U.S. Environmental Protection Agency – Recycling Basics and Benefits: https://www.epa.gov/recycle/recycling-basics-and-benefits
- Statista – Junk Removal Franchise Market Report: Referenced via multiple industry sources for market statistics and projections